Trezor.io/Start is your official gateway to setting up the Trezor hardware wallet. This simple, verified walkthrough helps you initialize your device, protect your crypto assets, and manage your wallet confidently. Whether you’re a beginner or a seasoned investor, Trezor ensures your private keys remain offline and fully under your control.
The Trezor Hardware Wallet is a pioneer in crypto self-custody. Built with advanced cryptography and open-source transparency, it stores your private keys offline, far from hackers or phishing threats. Developed by SatoshiLabs, Trezor combines modern design with hardware-level security trusted by millions of users globally.
Start by visiting https://trezor.io/start. Always verify the web address — never click links in emails or social media posts. From the official site, download the Trezor Suite app for your operating system (Windows, macOS, or Linux).
Plug in your Trezor using the provided USB cable. Trezor Suite will detect your device and guide you through installing the latest firmware. Always confirm the authenticity of firmware updates within the app before proceeding.
Select “Create New Wallet.” The device will generate a unique recovery seed — a 12, 18, or 24-word backup phrase that acts as your master key. This phrase is the cornerstone of your wallet’s security.
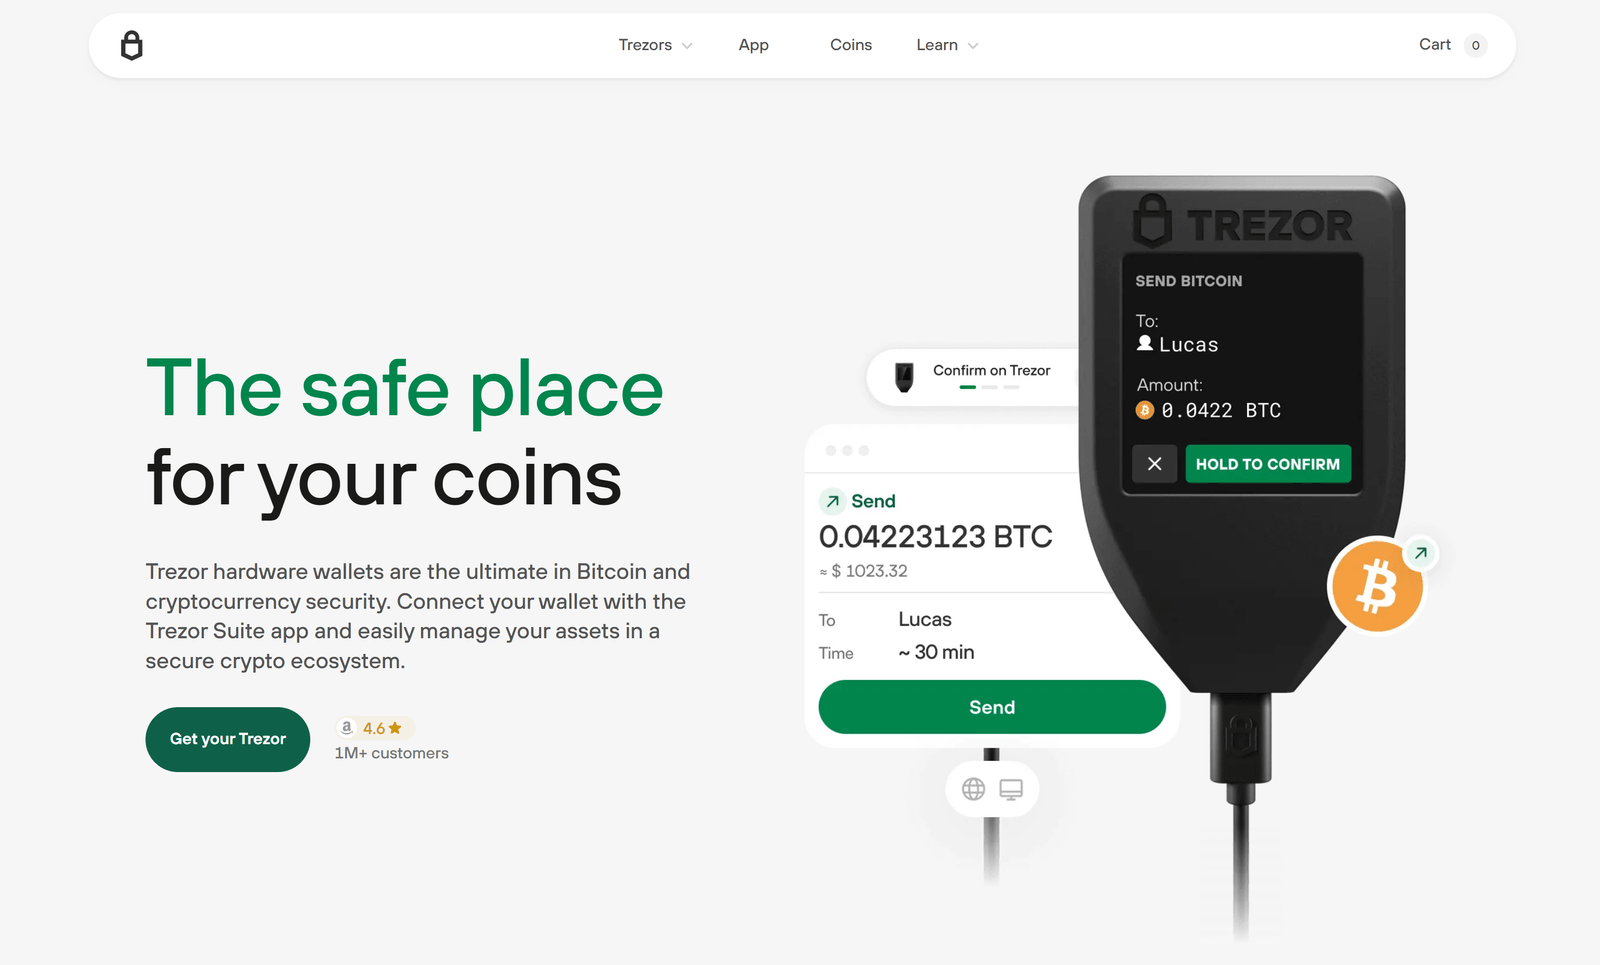
Set a personal PIN directly on your Trezor device. This code blocks unauthorized users from accessing your wallet, even if they physically possess it. Choose a strong, memorable PIN and avoid sharing it.
Trezor Suite will verify that your recovery seed is written correctly. Double-check each word and ensure you store it in a safe, offline location — ideally fireproof and waterproof.
Trezor supports over 1,000 coins and tokens, including Bitcoin, Ethereum, Litecoin, Cardano, and ERC-20 tokens. Install apps for your desired assets through Trezor Suite, and you’ll be ready to send, receive, and manage crypto securely.
Every transaction must be verified on your Trezor screen before approval. This ensures no malicious software can modify addresses or amounts — an essential layer of defense against fraud.
Regularly update your firmware through the official Trezor Suite. Updates include new features, security enhancements, and expanded coin support. Remember: always confirm updates directly on your device’s display.
Trezor Suite is your all-in-one platform for managing cryptocurrencies. It offers a clean interface for portfolio tracking, transaction management, and staking support. With built-in security checks and hardware validation, every action is verified by your device.
Ensure that your Trezor and packaging are untampered. Official Trezor boxes include holographic seals. If anything appears altered, contact support.trezor.io immediately before setup.
If your device is lost or damaged, your funds remain safe as long as your recovery seed is stored securely. Simply restore it on a new Trezor device using the “Recover Wallet” option in Trezor Suite.
The Trezor.io/Start guide empowers you to secure your digital assets with complete confidence. By following these steps, you ensure your crypto is protected from online threats, phishing scams, and unauthorized access. Remember: not your keys, not your coins — and with Trezor, your keys are always in your hands.